Creating a personalized letter box is an exciting way to combine functionality with creativity. Whether you’re designing a decorative piece for your home, a unique gift box, or a versatile storage solution, our web application, Box4U, allows you to design letter boxes for any letter from A to Z with ease. Therefore, let’s dive into how you can design a letter box using our tool and customize it to meet your specific needs.
Why Choose a Letter Box?
Letter boxes are versatile and can be used for various purposes:
- Decorative Uses: Add a personal touch to your home decor with letter boxes that spell out names, initials, or words.
- Gifting: Create a memorable gift box for special occasions like birthdays, weddings, or anniversaries.
- Storage: Organize small items like jewelry, stationery, or keepsakes in a stylish and practical way.
Clearly, with the right design, a letter box can be both beautiful and functional.
Key Features of Our Web Application
Our Box4U web application simplifies the process of designing a letter box by offering the following features:
1. 3D Preview
First of all, visualize your letter box in real time. Our 3D viewer lets you rotate, zoom, and inspect your design from every angle.
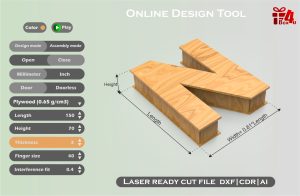
2. Customizable Dimensions
Additionally, you can adjust:
- Box Length: Set the overall length of the letter box to fit your needs.
- Box Height: Determine how tall the box should be.
- Material Thickness: Choose from standard thicknesses suitable for MDF, plywood, or acrylic.
- Finger Size: Customize the finger joints for a snug and sturdy fit.
3. Material Options
Moreover, select from materials like:
- MDF (Medium-Density Fiberboard)
- Plywood
- Acrylic
Each material option comes with its own unique texture, appearance, and durability.
4. Weight and Volume Estimation
Furthermore, our tool calculates:
- Net Weight: Based on your selected material and dimensions, providing an estimate for transport or installation.
- Internal Volume: Useful for determining the storage capacity of the box.
Step-by-Step Guide to Designing Your Letter Box
Follow these simple steps to create your custom letter box:
Step 1: Select Your Letter
To begin with, choose a letter from A to Z. Each letter is pre-designed with a basic structure that you can further customize.
Step 2: Adjust Dimensions
Next, use the sliders or input fields in the app to modify the dimensions:
- Increase or decrease the box’s length and height based on your requirements.
- Adjust the material thickness to ensure the box is strong enough for its intended use.
- Customize the finger size for a precise fit and aesthetic appeal.
Step 3: Choose Your Material
After that, pick from MDF, plywood, or acrylic based on:
- Appearance: Do you prefer a natural wood finish or a modern acrylic look?
- Durability: Consider the environment where the box will be used.
- Weight: Keep in mind the portability of the box.
Step 4: Visualize Your Design
Subsequently, use the 3D preview feature to examine your design. Rotate and zoom in to check every detail and make sure it’s perfect.

Step 5: Estimate Weight and Volume
Then, check the app’s weight and volume estimates to ensure the box meets your practical needs. This is particularly useful for storage or shipping considerations.
Step 6: Download the DXF File
Finally, once you’re satisfied with your design, download the DXF (Drawing Exchange Format) file. This file can be used with laser cutting machines to bring your design to life.
Tips for Designing the Perfect Letter Box
- Plan Your Dimensions Carefully: Consider what the box will be used for and adjust the size accordingly.
- Experiment with Materials: Try out different materials in the app to see which one fits your aesthetic and functional needs best.
- Pay Attention to Finger Joints: Properly sized finger joints ensure that the box is both durable and visually appealing.
- Think About Finishing Touches: For MDF or plywood, you can paint or stain the box after cutting. Acrylic boxes can be left clear or frosted for a sleek look.
Applications of Letter Boxes
Here are some creative ways to use your custom letter box:
- Home Decor: Arrange multiple letter boxes to spell out a word and display them on shelves.
- Corporate Branding: Create branded gift boxes shaped like the company’s initials.
- Event Planning: Use letter boxes as centerpieces or signage for weddings and parties.
- Educational Tools: Design boxes in the shape of letters to help children learn the alphabet.
Conclusion
In conclusion, designing a letter box has never been easier with our Box4U web application. Whether you’re a hobbyist, a professional designer, or someone looking for a unique project, this tool empowers you to bring your creative ideas to life. Start by selecting your letter, customize it to your liking, and download the design to get started. Indeed, the possibilities are endless!
